在本地配置好 Linux 环境(我用的 WSL),然后配置好 Sphinx 生成文档的样式,最后推送到 Github,并触发 Readthedocs 自动构建、生成在线文档
🎵🎵🎵🎵🎼🎼🎼🎼🎧🎼🎼🎼🎼🎵🎵🎵🎵
| Sphinx (opens new window) | Github (opens new window) | Readthedocs (opens new window) |
|---|---|---|
| <!-- |  (opens new window) (opens new window) |  (opens new window) (opens new window) |
# 最终效果
# Linux 配置
Win10 Ubuntu 子系统路径:
%USERNAME%\AppData\Local\Packages\CanonicalGroupLimited.UbuntuonWindows_79rhkp1fndgsc\LocalState\rootfs
# 更换 Ubuntu 源
# step 1: 首先看看国内有哪些源
| 名称 | 域名 |
|---|---|
| 阿里 | http://mirrors.aliyun.com/ubuntu/ |
| 163 | http://mirrors.163.com/ubuntu/ |
| 中科大 | https://mirrors.ustc.edu.cn/ubuntu/ |
| 清华 | http://mirrors.tuna.tsinghua.edu.cn/ubuntu/ |
| 电子科大 | http://ubuntu.dormforce.net/ubuntu/ |
# step 2: 获取 Ubuntu 代号
lsb_release -a
Ubuntu 18.04.1,查出来的代号就是 bionic.
# step 3: 编辑源
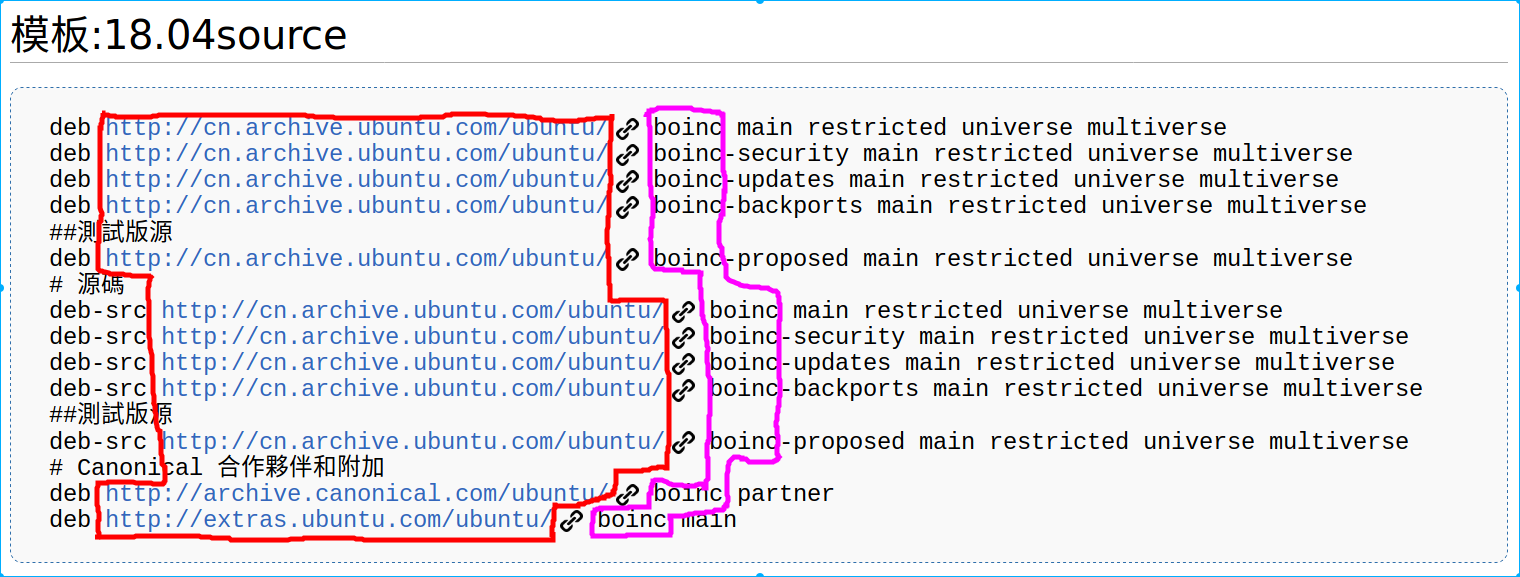
红色边框:服务器地址
紫色边框:Ubuntu 的代号(Codename)
# step 4: 修改源文件 sources.list
先备份
sudo cp /etc/apt/sources.list /etc/apt/sources.list.bcakup
再修改(如改为 163 源)
#163源
deb http://mirrors.163.com/ubuntu/ bionic main restricted universe multiverse
deb http://mirrors.163.com/ubuntu/ bionic-security main restricted universe multiverse
deb http://mirrors.163.com/ubuntu/ bionic-updates main restricted universe multiverse
deb http://mirrors.163.com/ubuntu/ bionic-proposed main restricted universe multiverse

##測試版源
deb http://mirrors.163.com/ubuntu/ bionic-backports main restricted universe multiverse

# 源碼
deb-src http://mirrors.163.com/ubuntu/ bionic main restricted universe multiverse
deb-src http://mirrors.163.com/ubuntu/ bionic-security main restricted universe multiverse
deb-src http://mirrors.163.com/ubuntu/ bionic-updates main restricted universe multiverse
deb-src http://mirrors.163.com/ubuntu/ bionic-proposed main restricted universe multiverse

##測試版源
deb-src http://mirrors.163.com/ubuntu/ bionic-backports main restricted universe multiverse
2
3
4
5
6
7
8
9
10
11
12
13
14
15
16
17
# step 5: 更新软件列表和升级
更新软件列表(检测出可更新的软件):
sudo apt update
更新软件:
sudo apt upgrade
# 安装 Python3、pip
# 安装python3
sudo apt install python3
# 安装pip
sudo apt install python3-pip
2
3
4
# 更换 pip 源
pip 国内的一些镜像
| 名称 | 域名 |
|---|---|
| 阿里云 | 阿里云 (opens new window) |
| 中国科技大学 | 中国科技大学 (opens new window) |
| 清华大学 | 清华大学 (opens new window) |
修改 ~/.pip/pip.conf (没有就创建一个), 内容如下:
[global]
index-url = https://pypi.tuna.tsinghua.edu.cn/simple
trusted-host=mirrors.aliyun.com
2
3
# Github 配置
克隆 一个新的公共的空白仓库到本地 ~\Sphinx_GitHub_ReadtheDocs
目录结构:
.
├── LICENSE
└── README.md
2
3
# Sphinx 配置
# 安装 Sphinx、及其插件
pip3 install sphinx sphinx_rtd_theme recommonmark sphinx-markdown-tables sphinxemoji
# 初始化 Sphinx
# 进入Git根目录
cd ~/Sphinx_GitHub_ReadtheDocs
# 开始快速配置sphinx
sphinx-quickstart

# 选择把源文件和删除文件分开(y)
> Separate source and build directories (y/n) [n]:y
# 项目名称
> Project name: Sphinx_GitHub_ReadtheDocs
# 作者姓名
> Author name(s): Tsanfer
# 版本号
> Project release []: 0.2
# 语言
> Project language [en]: zh_CN
2
3
4
5
6
7
8
9
10
11
12
13
14
15
目录结构:
.
├── LICENSE
├── Makefile
├── README.md
├── make.bat
└── source
    ├── _static
    ├── _templates
    ├── conf.py
    └── index.rst
2
3
4
5
6
7
8
9
10
验证配置是否正确:
cd ~/Sphinx_GitHub_ReadtheDocs
make html
2
浏览器打开./build/index.html查看
# 配置 Sphinx 主题,插件
配置./source/conf.py配置文件:
# -- General configuration ---------------------------------------------------

# Add any Sphinx extension module names here, as strings. They can be
# extensions coming with Sphinx (named 'sphinx.ext.*') or your custom
# ones.

extensions = [
        'recommonmark',
        'sphinx_markdown_tables',
        'sphinxemoji.sphinxemoji',
]

# -- Options for HTML output ------------------------------------------------

# The theme to use for HTML and HTML Help pages.  See the documentation for
# a list of builtin themes.
#
html_theme = 'sphinx_rtd_theme'

# The master toctree document.
master_doc = 'index'
2
3
4
5
6
7
8
9
10
11
12
13
14
15
16
17
18
19
20
21
添加./requirements.txt pip 要求文件(Readthedocs 配置时需要用到)
# markdown suport
recommonmark
# markdown table suport
sphinx-markdown-tables
#emoji
sphinxemoji

# theme default rtd

# crate-docs-theme
sphinx-rtd-theme
2
3
4
5
6
7
8
9
10
11
# 更改标题,添加目录,添加文件
配置./source/index.rst文件:
创建Sphinx + GitHub + ReadtheDocs托管文档
=====================================================

.. toctree::
   :maxdepth: 2
   :numbered:

   Sphinx_GitHub_ReadtheDocs
2
3
4
5
6
7
8
创建./source/Sphinx_GitHub_ReadtheDocs.md文件
# here is a test markdown file
然后同步到 Github
# Readthedocs 配置
导入代码库:

指定 pip 要求文件: ./requirements.txt 
# 完成
官方 Sphinx + Readthedocs 教程