在本地配置好 VuePress 环境和 TravisCI 配置文件,推送到 Github,触发 TravisCI 自动构建、生成在另一个分支的在线文档
 (opens new window)
 ![]() (opens new window)
(opens new window)
VuePress 在线文档链接_博客服务器 (opens new window)(如果上面进不去,可以进这个,服务器在阿里云)
# 最终效果

# 思路
# 总体
VuePress 在本地完成项目的源文件,推送至 Github 触发 Travis CI 自动构建目标文件,完成后自动部署到另一个 Github 分支,此分支作在线文档使用。
在 Github 上创建两个分支master和gh-pages,master用于上传源文件和触发 Travis CI 自动执行构建、部署脚本,gh-pages用于保存 Github Pages 的最终页面。
完成上述操作之后就只需修改文本源文件 Markdown 里面的内容,推送到 Github。Travis CI 便可自动构建、部署,使其工作流程简化。
# 过程
- 在本地创建配置 VuePress 工程上传到
master分支 - 上传成功后触发 TravisCI 开始自动构建
- 构建完成后将最终页面推送到
gh-pages分支
# 用到的东西
- SSH 密钥链接 Github
- VuePress 目录文件结构
- VuePress 配置文件
- TravisCI 自动构建配置文件
# 相关
VuePress:
每一个由 VuePress 生成的页面都带有预渲染好的 HTML,也因此具有非常好的加载性能和搜索引擎优化(SEO)。同时,一旦页面被加载,Vue 将接管这些静态内容,并将其转换成一个完整的单页应用(SPA),其他的页面则会只在用户浏览到的时候才按需加载。
GitHub Pages:
您可以使用 GitHub Pages 直接从 GitHub 仓库托管关于自己、您的组织或您的项目的站点
GitHub Pages 是一项静态站点托管服务,它直接从 GitHub 上的仓库获取 HTML、CSS 和 JavaScript 文件,(可选)通过构建过程运行文件,然后发布网站。
Travis CI
Travis CI 提供的是持续集成服务(Continuous Integration,简称 CI)。它绑定 Github 上面的项目,只要有新的代码,就会自动抓取。然后,提供一个运行环境,执行测试,完成构建,还能部署到服务器。
持续集成指的是只要代码有变更,就自动运行构建和测试,反馈运行结果。确保符合预期以后,再将新代码"集成"到主干。
持续集成的好处在于,每次代码的小幅变更,就能看到运行结果,从而不断累积小的变更,而不是在开发周期结束时,一下子合并一大块代码。
# Github 仓库
# 创建 Github 仓库
在 Github 官网上创建一个新的仓库(我仓库的名字叫VuePress-GithubPages-TravisCI)
# SSH 密钥链接 Github
# 生成 SSH 密钥
$ ssh-keygen
Generating public/private rsa key pair.
# 输入准备存放密钥的位置,公钥和私钥放在同一个文件夹
Enter file in which to save the key (/home/tsanfer/.ssh/id_rsa): /home/tsanfer/.ssh/test_key
# 输入口令,不需要口令就直接回车,这里我不需要口令,直接回车
Enter passphrase (empty for no passphrase):
# 确认口令,跟上面一样
Enter same passphrase again:
# 显示私钥位置
Your identification has been saved in /home/tsanfer/.ssh/test_key.
# 显示公钥位置,下一步需要添加公钥到Github中
Your public key has been saved in /home/tsanfer/.ssh/test_key.pub.
2
3
4
5
6
7
8
9
10
11
12
# Github 添加 SSH 密钥
在 Github 头像旁边的菜单中 Settings --> SSH and GPG keys --> SSH keys 中的右上角点击 New SSH key
下面要填入信息:
- Title:随便填
- Key:公钥文件里的所有内容(
~/.ssh/test_key.pub)
# 测试 SSH 密钥
测试一下密钥
ssh -T git@github.com
设置 Github 账号的地址
git config --global user.name "username"
git config --global user.email "useremail"

# 比如
git config --global user.name "Tsanfer"
git config --global user.email "a1124851454@gmail.com"
2
3
4
5
6
如果成功的话
Hi Tsanfer! You've successfully authenticated, but GitHub does not provide shell access.
用 SSH 的方式克隆仓库到本地
# 选一个文件夹克隆仓库
# 比如家目录
cd ~
git clone git@github.com:{Username}/{Repo}.git

# 比如
# cd ~
# git clone git@github.com:Tsanfer/VuePress-GithubPages-TravisCI.git
2
3
4
5
6
7
8
# 克隆完之后的目录
~/VuePress-GithubPages-TravisCI/
2
# 配置 VuePress
# 安装 VuePress
注意
请确保你的 Node.js 版本 >= 8。
# 安装 yarn
也可以安装 npm
# Debian / Ubuntu
在 Debian 或 Ubuntu 上,需要用 yarn 的 Debian 包仓库来安装 Yarn。 首先需要配置仓库:
curl -sS https://dl.yarnpkg.com/debian/pubkey.gpg | sudo apt-key add -
echo "deb https://dl.yarnpkg.com/debian/ stable main" | sudo tee /etc/apt/sources.list.d/yarn.list
2
更新库和下载 yarn
sudo apt-get update && sudo apt-get install yarn
运行命令来测试 Yarn 是否安装:
$ yarn --version
1.22.4
2
# Windows
直接下安装包,然后在 CMD 或者 Powershell 里运行
# 更换国内的源
先看一下当前的源
$ yarn config get registry
https://registry.yarnpkg.com
2
更换阿里淘宝的源
yarn config set registry https://registry.npm.taobao.org
# VuePress
# 先进入安装目录,就是刚刚克隆的仓库
cd ~/VuePress-GithubPages-TravisCI
# 安装
sudo yarn global add vuepress # 或者:npm install -g vuepress
2
3
4
然后试一下看是否安装成功
# 新建一个 markdown 文件
echo '# Hello VuePress!' > README.md

# 开始写作
vuepress dev .
2
3
4
5
ℹ 「wds」: Project is running at http://0.0.0.0:8081/
ℹ 「wds」: webpack output is served from /
ℹ 「wds」: Content not from webpack is served from /mnt/k/Git_Bash/VuePress-GithubPages-TravisCI/.vuepress/public
ℹ 「wds」: 404s will fallback to /index.html
success [00:00:17] Build 471ee0 finished in 8465 ms!
> VuePress dev server listening at http://localhost:8081/

# 生成的地址 http://localhost:8081/
2
3
4
5
6
7
8
用浏览器打开 vuepress 生成的网页的地址
或者构建静态文件
# 构建静态文件
vuepress build .
2
但会因为路径不对,网页的样式显示不出来
# VuePress 目录结构
官方给的结构
VuePress 遵循 “约定优于配置” 的原则,推荐的目录结构如下:
.
├── docs
│   ├── .vuepress (可选的)
│   │   ├── components (可选的)
│   │   ├── theme (可选的)
│   │   │   └── Layout.vue
│   │   ├── public (可选的)
│   │   ├── styles (可选的)
│   │   │   ├── index.styl
│   │   │   └── palette.styl
│   │   ├── templates (可选的, 谨慎配置)
│   │   │   ├── dev.html
│   │   │   └── ssr.html
│   │   ├── config.js (可选的)
│   │   └── enhanceApp.js (可选的)
│   │
│   ├── README.md
│   ├── guide
│   │   └── README.md
│   └── config.md
│
└── package.json
1
2
3
4
5
6
7
8
9
10
11
12
13
14
15
16
17
18
19
20
21
22
这里用到的结构
.
├── README.md // Github项目展示文件
├── docs  //vuepress项目根目录
│   ├── .vuepress //存放核心内容的文件夹
│   │   ├── public  //存放静态文件,如图片等
│   │   └── config.js //设定顶部导航栏、侧边导航栏等项目配置的核心文件
│   ├── pages //存放markdown页面的文件
│   ├── README.md //vuepress首页展示用的markdown文件
├── deploy.sh //用于编写TravisCI上传、发布的脚本文件
├── LISENSE //许可证文件
├── package.json  //Node.js项目描述文件
└── .travis.yml //Travis CI 自动部署文件
2
3
4
5
6
7
8
9
10
11
12
# 配置依赖和脚本
# 配置 package.json
在 package.json 里加一些脚本和后面要用的依赖:
{
  "dependencies": {
    "@vuepress/plugin-active-header-links": "^1.3.1",
    "@vuepress/plugin-medium-zoom": "^1.3.1",
    "@vuepress/plugin-nprogress": "^1.3.1",
    "@vuepress/plugin-back-to-top": "^1.3.1",
    "vuepress": "^1.3.1"
  },
  "scripts": {
    "docs:build": "vuepress build docs",
    "docs:dev": "vuepress dev docs"
  }
}
2
3
4
5
6
7
8
9
10
11
12
13
加载依赖
yarn
命令
yarn docs:dev # 或者:npm run docs:dev
yarn docs:build # 或者:npm run docs:build
2
# 页面的设置
# 首页
/docs/README.md
---
home: true
heroImage: https://cdn.tsanfer.com/image/vuepress_githubpages_travisCI.svg
actionText: 快速上手 →
actionLink: /pages/思路.md
features:
  - title: 简洁至上
    details: 以 Markdown 为中心的项目结构,以最少的配置帮助你专注于写作。
  - title: Vue驱动
    details: 享受 Vue + webpack 的开发体验,在 Markdown 中使用 Vue 组件,同时可以使用 Vue 来开发自定义主题。
  - title: 高性能
    details: VuePress 为每个页面预渲染生成静态的 HTML,同时在页面被加载的时候,将作为 SPA 运行。
footer: MIT Licensed | Copyright © 2020 Tsanfer
---
2
3
4
5
6
7
8
9
10
11
12
13
14
15
# 文档属性
/docs/.vuepress/config.js
module.exports = {
  base: "/VuePress-GithubPages-TravisCI/", //目录根地址,应与Github仓库名字相同
  title: "VuePress + GithubPages + TravisCI", // 显示在左上角的网页名称以及首页在浏览器标签显示的title名称
  description: "创建 VuePress + GithubPages + TravisCI 在线文档", // meta 中的描述文字,用于SEO
  head: [
    [
      "link",
      { rel: "icon", href: "/gamepad_game_128px.ico" }, //浏览器的标签栏的网页图标,基地址/docs/.vuepress/public
    ],
  ],
};
2
3
4
5
6
7
8
9
10
11
# markdown 扩展
/docs/.vuepress/config.js
module.exports = {
  markdown: {
    lineNumbers: true, //是否在每个代码块的左侧显示行号
  },
};
2
3
4
5
# 默认主题设置
# 导航栏
/docs/.vuepress/config.js
module.exports = {
  themeConfig: {
    nav: [
      //链接页面链接的根地址为/docs
      { text: "思路", link: "/pages/flow.md" },
      { text: "创建Github仓库", link: "/pages/Github.md" },
      { text: "配置VuePress", link: "/pages/VuePress.md" },
      { text: "TravisCI生成和发布", link: "/pages/TravisCI.md" },
      { text: "博客", link: "https://tsanfer.com" },
    ],
  },
};
2
3
4
5
6
7
8
9
10
11
12
# 侧边栏
/docs/.vuepress/config.js
module.exports = {
  themeConfig: {
    sidebarDepth: 2, //侧边栏深度
    sidebar: [
      ["/pages/flow.md", "思路"],
      ["/pages/Github.md", "创建Github仓库"],
      ["/pages/VuePress.md", "配置VuePress"],
      ["/pages/TravisCI.md", "TravisCI生成和发布"],
    ],
  },
};
2
3
4
5
6
7
8
9
10
11
# Git 仓库
/docs/.vuepress/config.js
module.exports = {
  themeConfig: {
    // 假定是 GitHub. 同时也可以是一个完整的 GitLab URL
    repo: "Tsanfer/VuePress-GithubPages-TravisCI",
    // 自定义仓库链接文字。默认从 `themeConfig.repo` 中自动推断为
    // "GitHub"/"GitLab"/"Bitbucket" 其中之一,或是 "Source"。
    repoLabel: "Github",
    // 以下为可选的编辑链接选项
    // 假如文档不是放在仓库的根目录下:
    docsDir: "docs/pages",
    // 假如文档放在一个特定的分支下:
    docsBranch: "master",
    // 默认是 false, 设置为 true 来启用
    editLinks: true,
    // 默认为 "Edit this page"
    editLinkText: "在 Github 上编辑此页",
  },
};
2
3
4
5
6
7
8
9
10
11
12
13
14
15
16
17
18
# 其他
/docs/.vuepress/config.js
module.exports = {
  themeConfig: {
    smoothScroll: true, //页面滚动效果
    lastUpdated: "最后更新", // string | boolean
  },
};
2
3
4
5
6
# 插件
/docs/.vuepress/config.js
module.exports = {
  plugins: [
    "@vuepress/medium-zoom", //zooming images like Medium(页面弹框居中显示)
    "@vuepress/nprogress", //网页加载进度条
    "@vuepress/plugin-back-to-top", //返回页面顶部按钮
  ],
};
2
3
4
5
6
7
提示
到这里其实已经完成配置了,可以执行 yarn docs:dev 来浏览配置的页面,
只是由于没有对应的 md 文件,打开的链接都会 404
# config.js 所有内容
module.exports = {
  base: "/VuePress-GithubPages-TravisCI/", //目录根地址,应与Github仓库名字相同
  title: "VuePress + GithubPages + TravisCI", // 显示在左上角的网页名称以及首页在浏览器标签显示的title名称
  description: "创建 VuePress + GithubPages + TravisCI 在线文档", // meta 中的描述文字,用于SEO
  head: [
    [
      "link",
      { rel: "icon", href: "/gamepad_game_128px.ico" }, //浏览器的标签栏的网页图标,基地址/docs/.vuepress/public
    ],
  ],

  //markdown扩展
  markdown: {
    lineNumbers: true, //是否在每个代码块的左侧显示行号
  },

  //默认主题配置
  themeConfig: {
    //导航栏
    nav: [
      //链接页面链接的根地址为/docs
      { text: "思路", link: "/pages/flow.md" },
      { text: "创建Github仓库", link: "/pages/Github.md" },
      { text: "配置VuePress", link: "/pages/VuePress.md" },
      { text: "TravisCI生成和发布", link: "/pages/TravisCI.md" },
      { text: "博客", link: "https://tsanfer.com" },
    ],
    sidebarDepth: 2, //侧边栏深度
    //侧边栏
    sidebar: [
      ["/pages/flow.md", "思路"],
      ["/pages/Github.md", "创建Github仓库"],
      ["/pages/VuePress.md", "配置VuePress"],
      ["/pages/TravisCI.md", "TravisCI生成和发布"],
    ],

    // 假定是 GitHub. 同时也可以是一个完整的 GitLab URL
    repo: "Tsanfer/VuePress-GithubPages-TravisCI",
    // 自定义仓库链接文字。默认从 `themeConfig.repo` 中自动推断为
    // "GitHub"/"GitLab"/"Bitbucket" 其中之一,或是 "Source"。
    repoLabel: "Github",
    // 以下为可选的编辑链接选项
    // 假如文档不是放在仓库的根目录下:
    docsDir: "docs",
    // 假如文档放在一个特定的分支下:
    docsBranch: "master",
    // 默认是 false, 设置为 true 来启用
    editLinks: true,
    // 默认为 "Edit this page"
    editLinkText: "在 Github 上编辑此页",

    smoothScroll: true, //页面滚动效果
    lastUpdated: "最后更新", // string | boolean
  },

  //插件
  plugins: [
    "@vuepress/medium-zoom", //zooming images like Medium(页面弹框居中显示)
    "@vuepress/nprogress", //网页加载进度条
    "@vuepress/back-to-top", //返回页面顶部按钮
    "@vuepress/nprogress", //提示加载进度
    "reading-progress", //提示阅读进度
  ],
};
2
3
4
5
6
7
8
9
10
11
12
13
14
15
16
17
18
19
20
21
22
23
24
25
26
27
28
29
30
31
32
33
34
35
36
37
38
39
40
41
42
43
44
45
46
47
48
49
50
51
52
53
54
55
56
57
58
59
60
61
62
63
64
# TravisCI 生成和发布
# 创建 gh-pages 分支
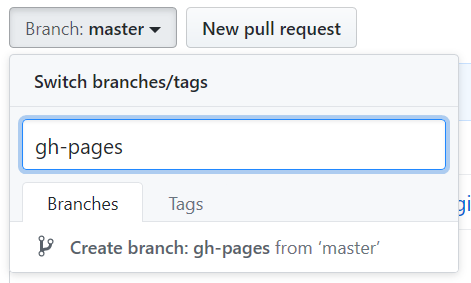
这时 Github 已经自动部署 gh-pages 分支为 Github pages 的生成源

# deploy.sh 部署文件
每当 Github 仓库更新时,会触发 Travis CI 执行 deploy.sh 脚本
创建一个如下的 deploy.sh 文件(请自行判断去掉高亮行的注释):
在项目根目录下创建
.
├── README.md     // Github项目展示文件
├── docs     //vuepress项目根目录
│   ├── .vuepress      //存放核心内容的文件夹
│   │   ├── public     //存放静态文件,如图片等
│   │   └── config.js     //设定顶部导航栏、侧边导航栏等项目配置的核心文件
│   ├── pages      //存放markdown页面的文件
│   ├── README.md     //vuepress首页展示用的markdown文件
├── deploy.sh     //用于编写TravisCI上传、发布的脚本文件
├── LISENSE     //许可证文件
├── package.json     //Node.js项目描述文件
└── .travis.yml //Travis CI 自动部署文件
2
3
4
5
6
7
8
9
10
11
12
#!/usr/bin/env sh

# 确保脚本抛出遇到的错误
set -e

# 生成静态文件
yarn docs:build

# 进入生成的文件夹
cd docs/.vuepress/dist

# 如果是发布到自定义域名
# echo 'www.example.com' > CNAME

git init
git add -A
git commit -m 'deploy'

# 如果发布到 https://<USERNAME>.github.io
# git push -f git@github.com:<USERNAME>/<USERNAME>.github.io.git master

# 如果发布到 https://<USERNAME>.github.io/<REPO>
git push -f git@github.com:<USERNAME>/<REPO>.git master:gh-pages
# 比如
# git push -f git@github.com:Tsanfer/VuePress-GithubPages-TravisCI.git master:gh-pages

cd -
2
3
4
5
6
7
8
9
10
11
12
13
14
15
16
17
18
19
20
21
22
23
24
25
26
27
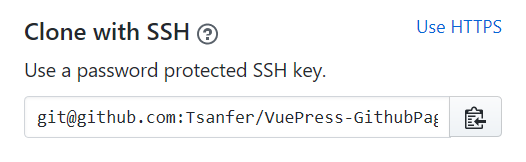
上面的 git 地址其实就是仓库的 SSH 地址
# Travis CI 部署文件
在项目的根目录创建一个名为 .travis.yml 的文件
.
├── README.md // Github项目展示文件
├── docs  //vuepress项目根目录
│   ├── .vuepress //存放核心内容的文件夹
│   │   ├── public  //存放静态文件,如图片等
│   │   └── config.js //设定顶部导航栏、侧边导航栏等项目配置的核心文件
│   ├── pages //存放markdown页面的文件
│   ├── README.md //vuepress首页展示用的markdown文件
├── deploy.sh //用于编写TravisCI上传、发布的脚本文件
├── LISENSE //许可证文件
├── package.json  //Node.js项目描述文件
└── .travis.yml //Travis CI 自动部署文件
2
3
4
5
6
7
8
9
10
11
12
language: node_js
node_js:
  - lts/*
install:
  - yarn install # npm ci
script:
  - yarn docs:build # npm run docs:build
deploy:
  provider: pages
  skip_cleanup: true
  local_dir: docs/.vuepress/dist
  github_token: $GITHUB_TOKEN # 在 GitHub 中生成,用于允许 Travis 向你的仓库推送代码。在 Travis 的项目设置页面进行配置,设置为 secure variable
  keep_history: true
  on:
    branch: master #这里指的是部署前的源文件分支
2
3
4
5
6
7
8
9
10
11
12
13
14
15
上面的 github_token 需要在 Github 上生成
# 生成和使用 Token
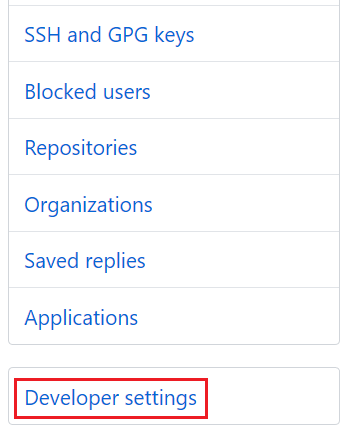
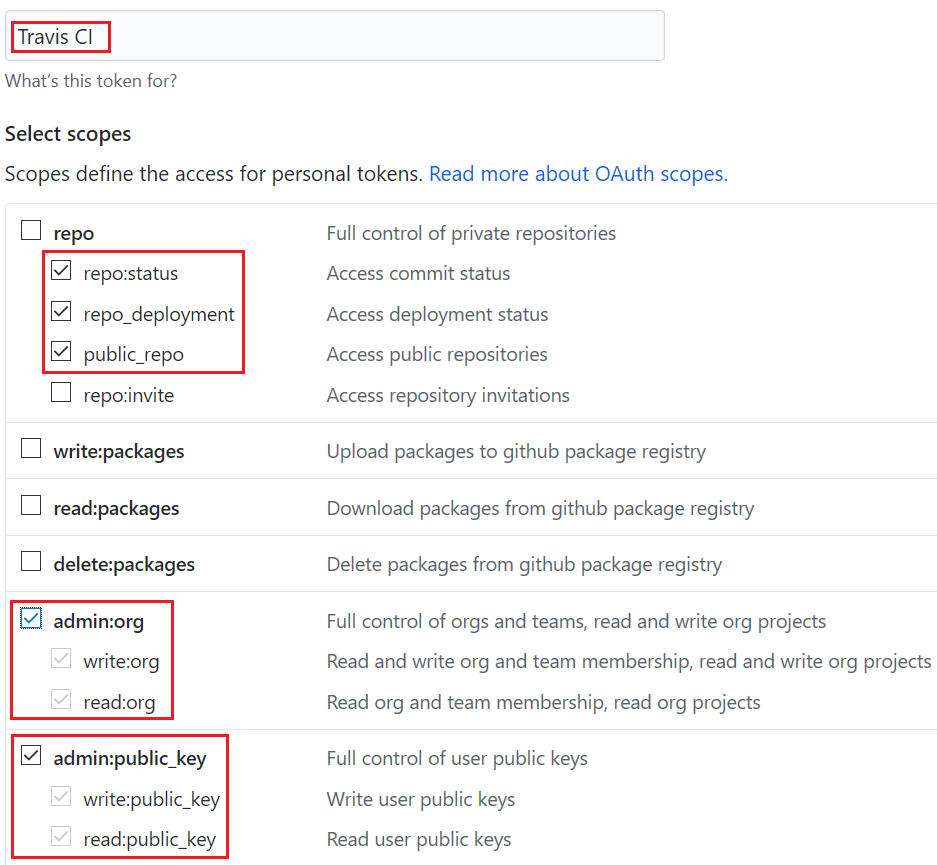
# 生成 Token
在 Settings --> Developer settings --> Personal access tokens 右上角 Generate new toekn 生成新 Token 名字随便写,权限不清楚的可以全部选上,也可以参考我下面的配置
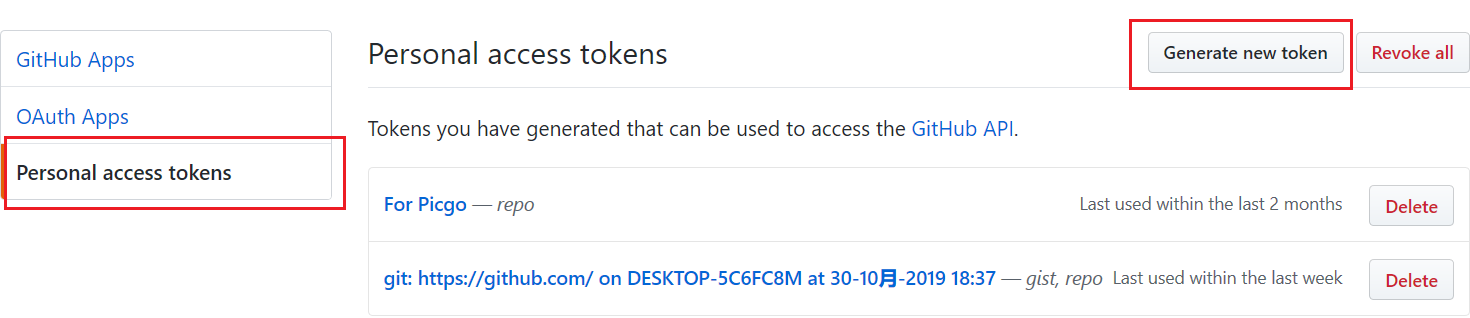
注意
下面的口令只出现一次,需及时保存

# Travis CI 绑定和配置
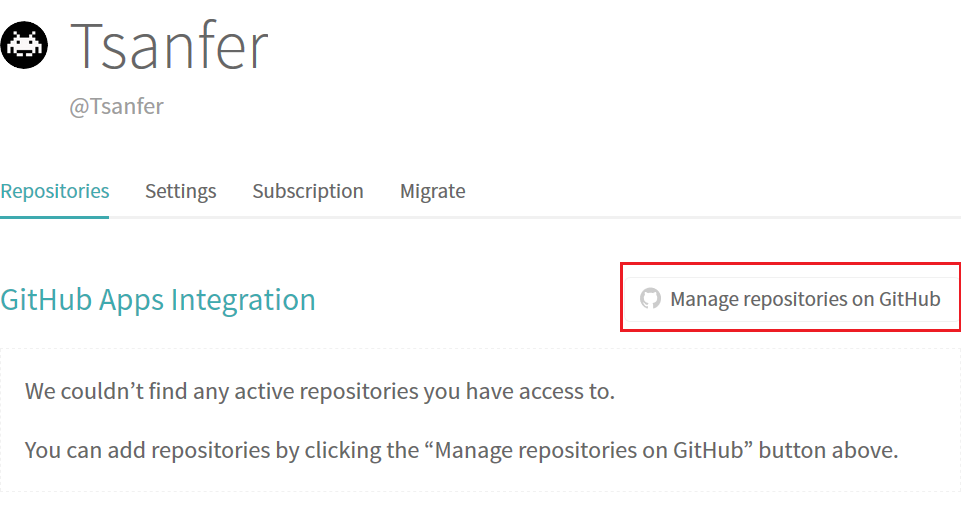
# 绑定 Github 账号
在 Travis CI 里面 Settings ---> Repositories 点击 Manage repositories on GitHub
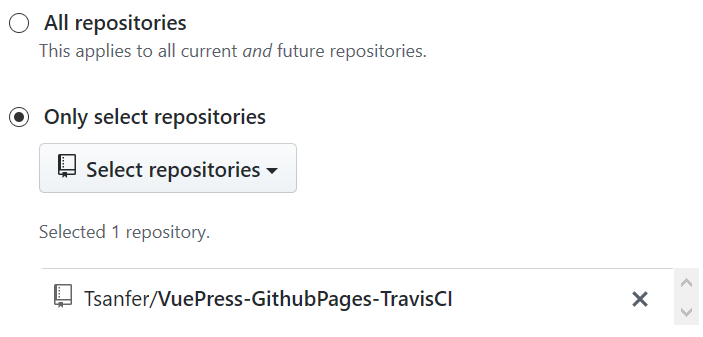
选择给权限的仓库,为了方便也可以把所有仓库的权限都给了
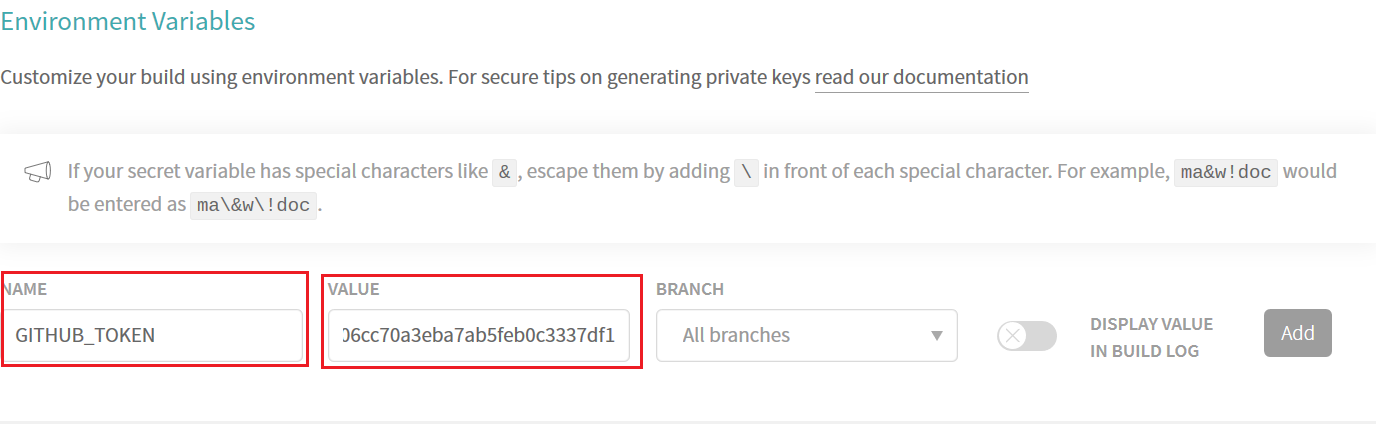
# 添加 Token
在项目的 Settings --> Environment Variables 中输入 Token
language: node_js
node_js:
  - lts/*
install:
  - yarn install # npm ci
script:
  - yarn docs:build # npm run docs:build
deploy:
  provider: pages
  skip_cleanup: true
  local_dir: docs/.vuepress/dist
  github_token: $GITHUB_TOKEN # 在 GitHub 中生成,用于允许 Travis 向你的仓库推送代码。在 Travis 的项目设置页面进行配置,设置为 secure variable
  keep_history: true
  on:
    branch: master #这里指的是部署前的源文件分支
2
3
4
5
6
7
8
9
10
11
12
13
14
15
- NAME : GITHUB_TOKEN (刚刚的
github_token: $GITHUB_TOKEN这个变量) - VALUE : ****刚刚的 Token****
# 推送到 Github
git add .
git commit -m '初步完成'
git push -f git@github.com:{Username}/{Repo}.git master

# 比如
# git push -f git@github.com:Tsanfer/VuePress-GithubPages-TravisCI.git master
2
3
4
5
6
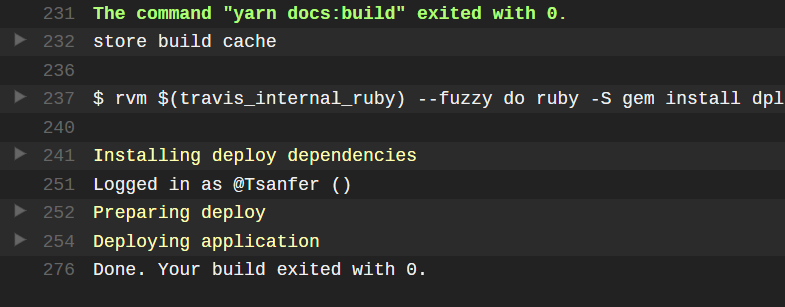
# 完成
如果没有 Travis CI 触发成功,构建没有问题的话就完成了